Version 1.0 Aug 15,1989
CHAPTER 4 - THE IMAGE EDITOR
ABOUT IMAGES
Images are pictures ... this is very obvious but what is not obvious is the various types that the Apple IIgs uses.
Most people are familiar with PIC images.made by commercial "paint programs". PIC images can be in either 320 or 640 mode. [320 x 200] or [640 x 200] pixels. 320 mode PIC images can use 16 different solid colors while 640 mode PIC images can use only 4. You will see 640 mode images that appear to have more than 4 colors but don't be fooled. There are only four possible solid colors. When you see a 640 mode picture that appears to have more than four colors it is using dithered colors which are two dissimilar 640 mode pixels next to each other. The combination will appear as a third color to the eye. These images can be said to be 320 mode in a 640 mode framework.
This can be confusing. It is not too important that understand the details ... ( but it is nice if you do!) The image editor handles these things automatically and provides you with 16 colors in both modes.
The Apple IIgs uses other images based on the above. This editor can create, Pixel Images, Icons and cursors.
A Pixel Image is a PIC Image that is less than 320 x 200 or 640 x 200 pixels in size ... kind of a mini-PIC.. Pixel images are always rectangular.
Icons are similar to pixel images except that they contain a mask. A mask is an image the same size as the main pixel image that signifies which pixels will show up and which ones will not. This allows you to create images that are not rectangular. They can be of any shape, and even have holes in them like a doughnut.
The last type of image is a Cursor. Cursors are similar to an Icon but are handled differently by the system. The ARROW is an example of a cursor image. Cursors have an attribute that other images do not have, this is a "Hot Spot". A Hot Spot is that pixel out of the image that represents the cursors actual X and Y position. The tip of the ARROW cursor is its hot spot.
The image editor makes it very easy to load one type of image and save it as another type. The main power of this editor, however, is in enabling the user to take a standard "Paint Program" type picture and capture a portion of it as either a pixel image, Icon or cursor.
EDITOR OPERATION
To use this editor you must put an image in the "capture window", by loading in any of the seven input types previously described using the menu bar selection File/Open. or by selecting FileINew320 or FilelNew640. If you are using a Filetype $C1 picture as an image source the editor will switch to the mode (640 or 320) that the picture was created in. You will have to use FileINew320 or FileINew640 to set the mode prior to loading the pixel image, icon or cursor types.
Once you have an image (even if its a blank screen for creating an image from scratch) you must select Edit/Capture and using the full window crosshair cursor click-drag-click a rectangle around the image you want to process. The image will slowly invert and an indicator bar will appear reporting the progress of the magnify operation taking place.
This magnify operation creates three windows containing the image just captured in a magnified form called "Image". The mask image (always completely black after capture) in a magnified form called a "Mask" and the captured image as an icon called an "Icon". The Image and Mask windows are editable with the "Pencil" cursor which is visible when the cursor position is in either window when it is the top-most or active window. The menu bar selection "Color" is now active and contains a color palette used to set the pencil color. You can now use the pencil to draw to the magnified image or mask.
Three functions help in drawing to the magnified images. Edit/Fill Image will change every pixel in the image window to the current color of the pencil. Edit/Fill Mask will set all the pixels in the mask window to black or white (on or off) using color #15 as white and any other color as black. Edit/Image to Mask will set all pixels that correspond to colored pixels in the image window to black (on) in the mask window and set all corresponding white (color #15) pixels to white (on).
If you need to reframe your image you can select Edit/Re-Capture which clears out the capture window and plots your current magnified image in the upper left region of the capture window. You then need to select Edit/Capture and capture your image again only this time at new rectangular coordinates which will in turn create the Image, Mask and Icon windows again. You can continue editing if needed.
If you are creating a Cursor you will need to set the "Hot Spot" with the menu selection Edit/Set Hot Spot. The hot spot is represented by a black rectangle initially around the upper left pixel of the magnified image. Simply select Edit/Set Hot Spot and click on the magnified pixel you want for the hot spot. The rectangle will move to surround the selected pixel.
When everything is just the way you want it select File/Save as.to preserve your handy-work. Be sure to set the radio buttons at the bottom of the save window for the type and style.
This outlines the major features and procedures implemented in using this editor, we will now discuss some of the finer points of image editing.
Special Explanations
SAVE IMAGES
Once you have created an image you will want to save it to disk so it can be incorporated into your program code.
Select FILE-SAVE AS ... and a save dialog box will appear. (See Fig 4.36)

Figure 4.36 Save Dialog Box
This box has buttons to select the drive, create a new folder, open or close a folder, cancel the operation and save the file. There is also a box for typing in a filename and 6 radio buttons across the bottom of the dialog box. These six buttons select the type of output you will be saving.
Three buttons on the left side of the dialog box select the style of of image you can save (Pixel image, icon or cursor). The three buttons on the right side select the filetype as Resource, Source or Binary.
Images do not need to be relocated in memory because they do not have absolute address references. This is why a binary form is provided instead of object code. Both source and binary saves are fairly straight forward and need no real explanation. Selecting Resource however will present some extra windows that control how resources are saved to disk.
Resources are identified by types and I.D.'s. The type for CALL BOX images are $1003 for pixel images, $8001 for icons and $1004 for cursors. These types are set by the editor, you need to set the I.D. for your resource. You can either rewrite an existing resource by double-clicking on its I.D. number or double-clicking the ---->New entry to save your resource as the next available I.D. number. (See Fig 4.37)
You can cancel the resource save operation by clicking the close box in the title bar of the resource I.D. window. You can also edit the resource I.D. (re-number or delete) by pressing and holding he OPTION key while double-clicking the desired I.D. (See Fig 4.38). When re-numbering resource I.D.'s be sure to use 8 hex digits (use leading zeroes to pad small numbers). Failure to do so will cause unpredictable results and could ruin the resource fork of the ProDOS file.
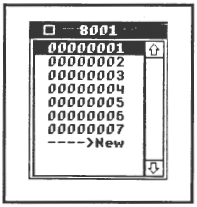
Figure 4.37 Save Resource ID. window
If a resource fork does not exist for a given ProDOS file a dialog box will appear giving you the option of creating one.

Figure 4.38 Edit Resource ID. Dialog Box
LOAD IMAGES
Once you have created images and saved them to disk you may want to load them back into this editor for further editing.
Select FILE-OPEN ... and a load dialog box will appear.
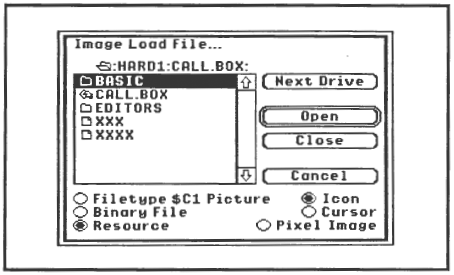
Figure 4.39 Load Dialog Box
This box has buttons to select the drive, open or close a folder, cancel this operation and open the file. There are six radio buttons across the bottom of the dialog box. These six buttons select the type of input you will be loading.
When loading images you must be very careful to have these buttons set properly for the type of input you will be loading. All filetypes will appear selectable in the scroll window and no special filtering is provided due to the fact that resources can be contained in any filetype. Loading the wrong type of file can result in a crash! You will just have to be careful.
Selecting Resource will present some extra windows that control how resources are loaded into memory.
Resources are assigned by types and I.D.'s. The type for CALL BOX images are $1003 for pixel images, $8001 for icons and $1004 for cursors. These types are set by the editor.you set just the I.D. for your resource. You can either rewrite an existing resource by double-clicking on its I.D. number or double-clicking the ---->New entry to save your resource as the next available I.D. number. (See Fig 40)
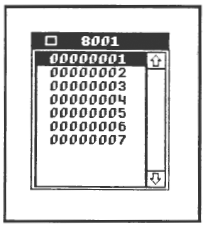
Figure 40 Load Resource ID. Window
You can cancel the resource save operation by clicking the close box in the title bar of the resource I.D. window. You can also edit the resource I.D. (re-number or delete) by using the OPTION key while doubleclicking the desired I.D. (See Fig 38) When re-numbering resource I.D.'s be sure to use 8 hex digits in the I.D. number (use leading zeroes to pad small numbers). Failure to do so will cause unpredictable results and could ruin the resource fork of the ProDOS file.
If a resource fork does not exist for a given ProDOS file a dialog box will appear giving you the option of creating one.
<- Previous | Next ->