Version 2.0 15 Jan-90
CALL DI the DIALOG commands
Dialogs are high level tool functions which are dependent on other toolbox functions as well as GS/OS (ProDOS16) commands. The Dialog functions need to be initialized by using the "high level" startup command CALL TL,2,"Desk" (see CALL TL in this manual for a complete description). This call will startup all tools needed for desktop applications ... the Dialog Manager is one of them.
Dialogs are designated as "entities" in the Call Box BASIC driver and these entities are created using the Call Box TPS Dialog Editor. The output type "object" must be used for dialogs that are to be used by the BASIC driver.
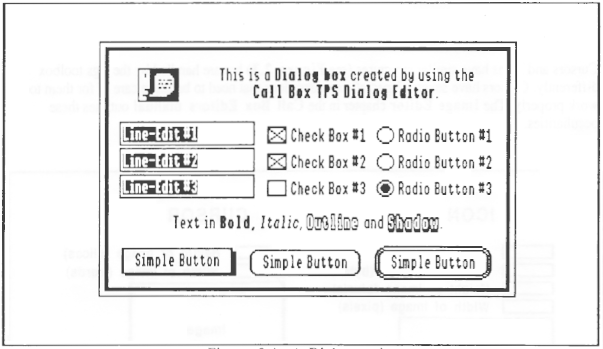
Figure 2.4 A Dialog entity
Operating a Dialog is semi-automatic. You must load it, open it and operate it. At this point the Dialog Manager has control of program execution and keeps it until you select something by clicking it or pressing the return key. Once a selection is made control is passed back to your application as well as the ID. number for the item selected. Your application can take action based on this ID. number and either close the Dialog or go back to it for further actions. This is a "Modal" type of access and is the most common type used with Dialogs. There is also a "Modeless" type of dialog (not supported directly) which allows you to choose items such as menu bar selections or other open modeless dialogs at the same time your Dialog is open. Open modal Dialogs must be closed before other desktop actions can take place.
The dialog can contain several types of controls (see Figure 2.4), each of which serve different purposes and are outlined as follows:
Simple button: This type of control is used to select an action. Simple buttons contain the text of the action to take such as "Continue", "OK", "Load", "Save" etc. A simple button with a double outline is the default button and aside from responding to a mouse click it will also respond to pressing the return key. The I.D. number of this type of button is always 1.
Check box: This type of control is used to select an "ON-OFF" type of status such as which items out of a group of items should be enabled. Each check box has some text associated with it which describes the significance of the check box.
Radio button: This type of control is used like a check box except that only one item out of a group of items can be selected at anyone time (like the buttons on a car radio). A group of buttons is called a "family" and a dialog can contain several families of radio buttons where only one button in each family can be set at any given time.
Line Edit: This type of control is used to enter text. This control obeys the standard Apple rules for text entry like click to position the typing cursor, double clicking to select a word or triple clicking to select a complete sentence. The delete key will remove all selected text and text is entered directly from the keyboard in insert mode.
Icon: This type of control is not really a control but a picture instead. Its purpose is purely decorative or used as a symbolic title such as a "stop sign" or "caution sign" to alert the user of possibly destructive actions.
Static Text: This is not a control either, but is a word or phrase used to identify the dialogs purpose. This would probably be the title of the dialog box.
Note: Functions such as Hi-liting or dimming controls is accomplished by using direct Control Manager commands via the CALL LC command. The use of "hook" procedures is possible as well by using the CALL LC command. The vast majority of applications will need to use the CALL DI commands for all of their functions, the more exotic control procedures however are possible but this manual will not describe them. Use the Apple IIgs Toolbox reference manuals (vol. 1 2 and 3) which outline all of the toolbox commands for more sophisticated programming procedures. These manuals are essential for a complete understanding of the vast number of toolbox calls available.
Dialog Controls Items and Item I.D.'s
The Call Box TPS Dialog Editor allows you to create dialogs by arranging dialog controls (items) in a dialog window. These items each have a unique I.D. number automatically assigned by the editor. It's important that you know what these item I.D.'s are because after you select something in a dialog the I.D. number of what you selected is returned to you and you will need to take some action based on which item I.D. is returned.
The I.D. numbers assigned by the Dialog Editor are shown in Figure 2.5.
Check boxes and Radio buttons do not hilite and un- Radio Button hilite automatically. Each time one of them is selected Check Box control passes back to you and you must check or un-check Icon etc ... by setting (1) or un-setting (0) the items value by Line Edit using theSetValue andGetValue commands. Once you Static Text have handled one of these items you loop back to the Operate Dialog command and wait for another event.

Figure 2.5 Dialog I.D.s
Line Edit items will operate automatically but you must fetch their contents (strings) before you close the dialog box (this applies to any item valu'e you are interested in as well) with the GetText command. Simple buttons also operate automatically which leaves us with Icons and Static text which are not controls.
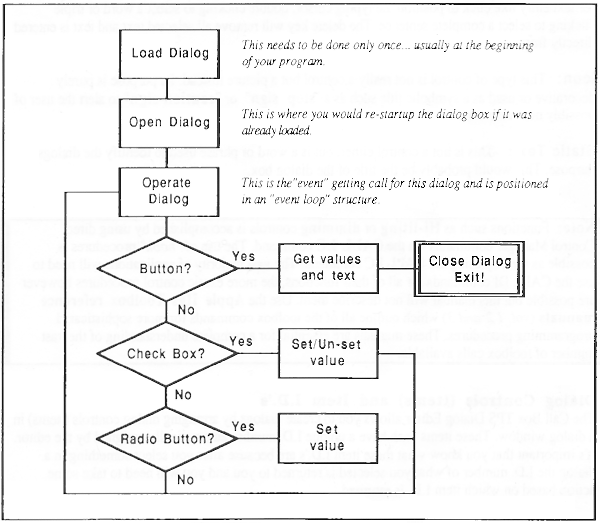
Figure 2.6 Typical Dialog operation logic diagram
Dialog Operation
The logic diagram in Figure 2.6 shows the normal operation of a dialog box. Sometime before you need it you load a dialog entity created by the Call Box TPS Dialog editor.
100 CALL DI,O,N,"MyDialog"
 | Note: At this point you could preset some values and text in the dialog box. Use the SetValue and SetText commands to preset item data before using your dialog box. |
Some action in your program such as a menu selection occurs which calls for your dialog box to come up and you open the dialog (which makes it visible on the screen). N is the dialog boxes "Entity" or port number, for our purposes make N = 1.
110 CALL DI,1,N
The next step is to set up an "event loop" type of programming structure to operate the dialog from. This loop centers around the command Operate Dialog (CALL DI,2 ... ).
120 CALL DI,2,N,1
This call works like CALL EV (Event) command except that it maintains control of program exexution until you select an item in the dialog box. Once you have selected something the I.D. number of that item is returned to you in the variable I. You must "test" this number to see which item you have selected by comparing it to known values. If your I value is greater than 0 and it's less than 17 then the item selected was a button, if this value is greater than 16 but less than 33 then a radio button was selected, if it's greater than 32 but less than 49 then it was a check box (See Figure 2.5). If none of the above is true then loop back to the OperateDialog command.
130 IF I > 0 AND I < 17 THEN 200
140 IF I >16 AND I < 33 THEN 300
150 IF I >32 AND I < 49 THEN 400
160 GOTO 120
If line 150 is "true" (A check box was selected!) then you need to toggle the state of the check box that was clicked. First get the items value with GetValue (CALL DI,4 ... ) and then check if it is 0 or not. If it's 0 then set it to 1 by using the SetValue (CALL DI,S ... ) command. If it's 1 then set it to 0 using the SetValue command as well.
400 CALL DI,4,N,I,V : CALL DI,5,N,I,1-V : GOTO 120
If line 140 is true (A radio button was selected) then you need only set the items value to 1 (the Control Manager will unset the currently set button in the radio family automatically).
300 CALL DI,5,N,I,1 : GOTO 120
If line 130 is true (A simple button was selectea; you will probably be exiting the dialog box such as if the OK or Continue button was clicked. Before you do this remember to save all the current values of the items in the dialog box, including the text strings in any line edit items by using the Get Value and GetText commands for each item of interest. After you have retrieved your data you must close the dialog box.
200 REM Get all the returned values here ...
210 CALL DI,3,N : END
The dialog will stay in memory until you shut down your program and is restartable by simply opening it again. The settings made to radio buttons and check boxes as well as the text in line edit items is preserved from usage to usage. Your dialogs will remember their previous settings.
Dialog Commands
There are 9 commands that control dialogs. Dialogs must be used only when thedesktop is active. (See CALL WN in this manual for a complete description)
| COMMAND | FUNCTION | DESCRIPTION | CALL DI,O,N,"pathname" | LOAD DIALOG: | this will load a dialog from disk as entity (N = 1-31). |
| CALL DI,1,N | OPEN DIALOG: | this makes the current dialog visible. |
| CALL DI,2,N,1 | OPERATE DIALOG: | this routine returns the item I.D. (1) of the item clicked in the dialog. |
| CALL DI,3,N | CLOSE DIALOG: | this removes the (N) dialog from the screen. |
| CALL DI,4,N,I,V | GET VALUE: | this gets the value of item (1) returned in variable (V). |
| CALL DI,5,N,I,V | SET VALUE: | this sets the value of item (1) specified by variable (V). |
| CALL DI,6,N,I,A$ | GET TEXT: | this gets the text contained in line edit item (1) and puts it in variable (A$). |
| CALL DI,7,N,I,A$ | SET TEXT: | this sets the text in line edit item (1) to the variable or string (A$). |
| CALL DI,8,N,P | GET POINTER: | this returns the pointer to the current dialog. |
N
Entity number for this dialog (1-31)
I
Item number of an item in the current dialog box (See Figure 2.5)
V
The value of an item... 1 - checked (checkbox), hilited (radio button) and 0 = unchecked (checkbox), unhilited (radio button).
"pathname"
This is the ProDOS pathname of a dialog (filetype $B1... OBJ) created with the Call Box TPS Dialog Editor.
P
This is the pointer to the current Dialog Box. This pointer is needed by various toolbox calls accessible thru the Long Call (CALL LC) command.