So What Techncial Notes
#14
Call Box
Controls in Windows
Written by: William Stephens - May 15,1990
This technical note describes how to create windows that have controls in them. This procedure gives you more flexibility than using just the Dialog Manager.
The Dialog Manager is a very convienient tool to use for user interaction but is limited in the types of controls it can present. You can take matters into your own hands and be your own Dialog Manager by using a Window that contains controls that you manage yourself. There is a little more work involved in managing your own controls than there is in operating the Dialog Manager, but the increased functionality of dialogs created this way far outweighs the added difficulty.
Virtually every call you will make with this type of window will be of the Long Call variety. Before we get into the exact procedure we should first cover the command syntax:
NewControl
This call adds a control parameter list to the specified window record and returns the handle for the control created. This handle is used to find the control later on and should be stored by your program for each control created. If zero is returned then there was an error in creating the control.
CALL LC,_0,_W,_R,_T,F,V,P1 ,P2,_C,_0,_0\$0910\_CH
FindControl
This call returns the handle of which control was hit (if any) based on the global mouse coordinates and the window pointer. You must supply a 4 byte buffer for the results.
CALL LC,0,_CH,X,Y,_W\$1310\P
TrackControl
This call acts like the Event Manager and tracks the mouse action you take after button down on the control. If you depress the mouse on a control and then without releasing, move the pointer off the control this routine will signify that no control has been selected.
CALL LC,0,X, Y,_0,_CH\$1510\P
DrawControls
This call draws all the controls in the specified window. This routine is usually used in update event loops and in wContDefProc's.
CALL LC,_W\$1010\
GetCtlValue
This call gets the value of the selected control.
CALL LC,0,_CH\$1A10\V
InvalRect
This call tells the Window Manager that a rectangle has changed and must be updated.
CALL LC,_RE\$3A0E\
HiliteControl
This call hilites or un-hilites the specified control. This call is used to blink or dim buttons and things like that.
CALL LC,H,_CH\$1110\
SetCtlValue
This call sets the value of the selected control.
CALL LC,V,_CH\$1910\V
SetContentDraw
This call sets the specified window with a new wContDetProc (window contents drawing procedure).
CALL LC,_P,_W\$490E\
BeginUpdate
This call sets up the Window Manager to handle update events.
CALL LC,_W\$1E0E\
EndUpdate
This call ends the update session.
CALL LC,_W\$1F0E\
_W
Windows pointer, Get from CALL WN,8 ...
_R
Pointer to controls enclosing rectangle
_T
Pointer to text string, Pascal 0
F
Control Flags (see fig. 14.1)
V
Controls Value.
PI
Data size for scroll bar, if not scroll then 0.
P2
View size for scroll bar, if not scroll then 0.
_C
Standard Control TypeValues:
$00000000 (0) = Button
$02000000 (33554432) = Check Box
$04000000 (67108864) = Radio Button
$06000000 (100663296) = Scroll Bar
$08000000 (134217728) = Size Box
_CH
Controls handle.
X
Horizontal mouse coordinate
Y
Vertical mouse coordinate
_P
Contents Draw pointer usually 0
_RE
Window rectangle pointer
H
Hilite Flag 0 = none, 1-253 = part code, 255 = inactive
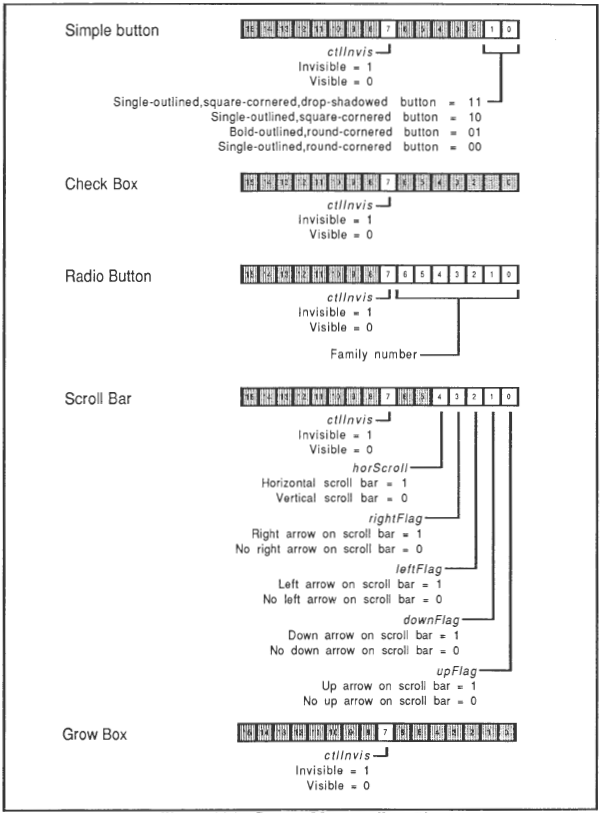
Figure 14.1 Control Manager Flag Bits
This procedure is shown in the program "control.demo" on the C.B.P.A.2 Sampler disk. This program was created by starting off using the "Desktop.Tmplt" program found on C.B.P.A.l and then control operating code was added.
The fIrst thing you need is a Window for your controls to be drawn in. Use the Call Box Window Editor to create a window with the following specifIcations ...
Window type: Alert
Normal Rectangle: 25,150,175,550
Zoom Rectangle: 0,0,0,0
wDataH and wMaxH: 150
wDataW and wMaxW: 400
Save this window away to disk as an object file named "ctrl.window". Now load up the program template called "Desktop.Tmplt" and save it to disk as the program "my.ctrl.demo". All of the following steps will involve adding program lines to the "my.ctrl.demo"program ... Let's roll up our sleeves and make a control window now!
Next we need is a work area for some of the control parameters. In this example I will use a "Direct Page" (see tech note 4) because I will not need over 256 bytes of space and both poke/peek and LongPoke/LongPeek commands work there. For larger control records you can use a larger block of memory as allocated by the Memory Manager in tech note 2. You may, however wish to use several direct pages instead because even though using direct pages decreases the available Applesoft code memory, both kinds of peeks and pokes will work. Memory Manager memory blocks can only be LongPeeked or LongPoked unless they are located in bank zero ... which is impossible because Call Box BASIC and the SYSTEM own all of bank zero and nothing is left down there to allocate except for direct page requests made to ProDOS8 and Call Box BASIC.
Type in line 56010 which allocates a direct page for your use and assigns the variable UP to point to it.
56010  CALL PO,4,704,$F52001A9 : CALL PO,2,708,$60BE : CALL704 : A = PEEK(PO + 244) :
       A = A + 1 : POKE PO + 244,A : UP = PO - (A*256)
You now need to install the control wContDefProc.
This is a native mode machine code routine which is specifIed as follows:
wContDefProc      pea      $0000           ;Push on the Window
                  pea      $0000           ;Pointer
                  Idx      #$1010
                  jsl      $E10000         ;_DrawControls
                  rtl                      ;Exit
Type in line 56020 to put this code in memory.
56020  DATA 244,0,0,244,0,0,162,16,16,34,0,0,225,107 : FOR X = 0 TO 13 : READ A : POKE UP
       + X,A : NEXT : DX = 16
The next thing to do is to put in the control rectangles and the control text if any.
These two items need to be poked into your workspace because the control manager handles these items by their pointers and not the actual data themselves.
This is a common type of referencing in tools and this is why you usually need some kind of workspace to use tools effectively.
In this example we will use all 5 types of standard controls, namely: Simple Button, Check Box, Radio Button, Scroll Bar and Grow Box.
I have divided the 256 byte work area into 16- 16 byte long sections where each section handles either a rectangle or a Pascal type 0 string.
The first 16 bytes of this area contains the wContDefProc you just entered with line 56020.
The first rectangle will be located 16 bytes into the area and its corresponding string will reside 128 bytes from the beginning of the rectangle.
The second will be 32 bytes in and 160 bytes respectively and so on.
This scheme is easy to index and is written by the control poker code at 55000.Let's enter the control poker code first:
55000  REM
              Control Poker

55010  READ A : CALL PO,2,0 + DX + UP,A : READ A : CALL PO,2,2 + DX
       + UP,A : READ A : CALL PO,2,4 + DX + UP,A : READ A : CALL
       PO,2,6 + DX + UP,A : READ A$ : DX = DX + 128 : GOSUB 55900 :
       DX = DX - 112 : RETURN
55900  L1 = LEN (A$) : FOR I = 1 TO L1 : A = ASC (MID$ (A$,1,1)) : POKE
       DX + UP + I,A : NEXT: POKE DX + UP,L1 : RETURN
Use the following lines to poke the controls rectangles and text:
56029  REM
             Poke in the controls rectangles and text

56030  DATA 46,240,60,300,Button : GOSUB 55000
56032  DATA 68,240,82,400,Check Box : GOSUB 55000
56034  DATA 86,240,100,380,Radio Button: GOSUB 55000
56036  DATA 106,240,120,380,. : GOSUB 55000
56038  DATA 129,240,143,268,. : GOSUB 55000
This completes the Environmental Initialization for your program.
Basically, you have created and initialized your direct page work area and installed the support data for the 5 controls.
There is a bit more initialization left to do but some other things must happen first.
You will notice that line 20 of your program ends with a GOSUB 56000 which runs all the code you just typed in.
Add one more statement to the end of this line.
This statement puts a pointer to the Call Box BASIC TaskRecord in the variable VR.
This pointer is needed for Update event detection later on.VR = ( PEEK (PO + 120) * 65536) + 593
Next you need to load your window in as entity number 4:
52     CALL WN,0,4,"entity:window:ctrl.window" : CALL WN,1,4 :
       GOSUB 42
Now that the window is in we can complete the control initialization.
The following line derives the windows pointer and then patches this pointer into the control wContDefProc located in your direct page workspace:
110    CALL WN,8,4,WP,1 : CALL PO,2,1 + UP,0 - INT (WP / 65536) :
       CALL PO,2,4 + UP,0 + WP - INT(WP / 65536) * 65536
It's now time to issue the NewControl calls which add the controls to the window:
112    CALL LC,_0,_WP,_16 + UP,_16 + 128 + UP,!0000000000000011
       ,0,0,0,$00000000,_0,_0\$0910\C1
114    CALL LC,_0,_WP,_32 + UP,_32 + 128 + UP,!0000000000000000
       ,0,0,0,$02000000,_0,_0\$0910\C2
116    CALL LC,_O,_WP,_49 + UP,_48 + 128 + UP,!0000000000000000
       ,0,0,0,$04000000,_0,_0\$0910\C3
118    CALL LC,_0,_WP,_64 + UP,_64 + 128 + UP,!0000000000011100
       ,0,1,10,$06000000,_0,_0\$0910\C4
120    CALL LC,_0,_WP,_80 + UP,_80 + 128 + UP,!0000000000000000
       ,0,0,0,$08000000,_0,_0\$0910\C5
the final step in getting this window up is to hookup the wContDefProc, show the window and draw the controls:180 CALL LC,_UP,_WP\$490E\ : CALL WN,4,4,1 : CALL LC,_WP\$1010\If you run your program at this point you will see your window with the 5 controls drawn in it. These controls will not work as of yet but they will at least be there! The following discussion is about how to operate the controls that you have created. Operating the controls is similar to operating a dialog box except that you use TaskMaster to get your events rather than a proprietary dialog manager command like ModalDialog. You want to respond to Window Content Hit events (code 19) in order to find, track and respond to control hits.
Add the following line to detect a hit in the contents region of your window:
240 IF C = 19 THEN 500 : REM Contents Hit!This line will route any mouse click in your window to the routine at 500. The first thing you need to do at 500 is to check and see if a control was hit and if it was, which control it is. The FindControl command does this task and returns the controls handle. The next step is to fetch this handle and then TrackControl which checks if the mouse button was released in the same control. If it is then this can be considered a valid control hit which you can now process. Type in the following lines to Find and then Track your control:
500    CALL LC,0,_250+UP,X,Y,_WP\$1310\P : REM FindControl
510    IF P = 0 THEN 200
515    CALL PE,4,250 + UP,H : REM Fetch the control handle
520    CALL LC,0,X,Y,_0,_H\$1510\P : REM TrackControl
525    IF P = 0 THEN 200
Now we are in the home stretch ... all that is left to handle is comparing the returned control handle to the handles returned from the NewControl calls and then taking some action based on which control was hit. Type in the following lines to compare the handles:
530    IF H = C1 THEN 598 : REM Button Hit!
535    IF H = C2 THEN 600 : REM Check Box Hit!
540    IF H = C3 THEN 600 : REM Radio Button Hit!
545    IF H = C4 THEN 620 : REM Scroll Bar Hit!
550    IF H = C5 THEN 598 : REM Grow Box Hit!
As you can see some of the control handlers are the same ... as a matter of fact I am only using 3 handlers for 5 controls. These handlers are analogous to some routine that you want to run in response to a control hit. Buttons and the Grow Box have no radical function except to remain at value 0 until you click in it when the value changes to 1 ... trapping the value of a button is kind of meaningless because just the fact that you detected a hit in the control is enough justification to act upon the hit. For our purposes we will use a "Do Nothing" routine for these controls:
598 GOTO 200Check boxes and Radio Buttons have a more complicated life. These controls display and retain a status (either checked and unchecked or selected and WlSelected). You handle these controls just the same way you do in Dialogs, the only thing that changes is the Set and Get commands ... the methodology is identical. In this example we will use a "value toggle" routine for both:
600 CALL LC,0,_H\$1A10W : CALL LC,1 - V,_H\$191 0\ : GOTO 200This leaves us with scroll bars which are more complicated still. Scroll Bars actually have 5 parts to them ... 2 arrows, 1 thumb and 2 page regions (the greyed areas). Each of these parts has a part code. (see fig. 14.2)
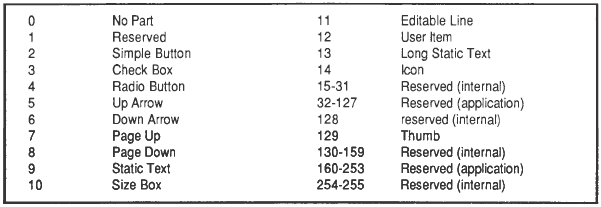
Figure 14.2 Control Manager Part Codes
In this example we will handle the arrow and page regions the same to simplify this example. Each part code usually responds to a different handler. The plan here is to check which part of the Scroll Bar was hit and then alter the value of the Scroll bar to suit... a click on the left arrow or page will cause the control value to decrease by 1 and a click on the right arrow or page will increment it.
Type in the following lines to install this simple scroll bar handler:
620   IF P = 6 OR P = 8 THEN 650 : REM Part Code = Rt.Ar. or Rt.Pg.
630   IF P = 5 OR P = 7 THEN 660 : REM Part Code = Lt.Ar. or Lt.Pg.
640   GOTO 200
650   CALL LC,0,_H\$1A10W : IF V = 9 THEN 200
651   V = V + 1 : CALL LC,V,_H\$191 0\ : GOTO 200
660   CALL LC,0,_H\$1A10W : IF V = 0 THEN 200
661   V = V - 1 : CALL LC,V,_H\$1910\ : GOTO 200
Now that you think you are done it is tiule to inform you that there is one more detail to take care of ... that is Update Events! If something changes in your window the Window Manager will fix up the window to appear just right automatically, this is one of the benifits of using the desktop environment. As you may have noticed you have not entered any commands to draw the controls except initially in the setup code. You will not have to handle this task directly ... the Window Manager handles this for you through the wContDetProc and the Update code. The Update code is very similar to the wContDetProc except that 3 new commands are needed. These commands are InvalRect, BeginUpdate and EndUpdate. You will have to install 3 more lines of code to handle Update events. One line installs a rectangle for the whole window, one line detects the Update Event and the last is the update event handler: Type in the following lines to complete your Control Window:
56040  DATA 0,0,150,400,. : GOSUB 55000

230    CALL PE,2,VR,V : IF V = 6 THEN 295 : REM Update Event

295    CALL LC,_96 + UP\$3A0E\ : CALL LC,_WP\$1E0E\ : CALL
       LC,_WP\$1010\ : CALL LC,_WP\$1F0E\ : GOTO 200
This is about it for this tech note.
I have given you the basics and you can take it from here altho proceeding without the Apple IIgs Toolbox Reference Manuals is kind of like buying a new car and telling the salesman to leave the drive shaft out!
Everything appears to be there but the car will not move on its own.
The Toolbox Reference's present much more information than is economically possible in a forum like this.Some of the benifits in putting controls in windows is that you can also put other things in there as well ... like Line Edit Items, List Controls, Icons; Quickdraw.artwork and virtually any graphic device possible with the Apple IIgs Toolbox. The handling of these other items may possibly be outlined in futtlre tech notes but don't count on it... these tech notes take a lot of time and effort to produce and there is more important fish to fry!
Further Reference
Call Box BASIC Manual V2.1
Apple IIgs Toolbox Reference Vol. 1,2 and 3 Tech Note 2 and 4
Call Box - So What Software 10221 Slater Ave. Suite 103 Fountain Valley, CA. 92708