Version 1.0 Aug 15,1989
CHAPTER 1 - THE WINDOW EDITOR
OVERVIEW
The CALL-BOX Window Editor creates templates for use by the Apple IIgs Window Manager. This editor can load either OMF2 object code or resources and can output APW/ORCA sourcecode, OMF2 object code and resources. The resource filetype is $1002 and uses a converter to get into memory. The standard programming procedure for resources is presented at the end of this chapter.
WINDOWS
A window is a presentation feature in which text or graphic information, can be displayed. Windows can be of any size and can be displayed on the screen singly or in groups depending on the application.
Windows allow an application to control more information than the screen can display at one time. The term Window is used because the user sees through the window into a larger area.
The Window Editor, can produce Document and Alert windows. The alert window frame is a double rectangle, the same as is used by the Dialog Manager to create a dialog box. The Document frame is a single outline. While the Alert frame is just a frame the document windows frame can have controls as described below. (See Fig 1.1)
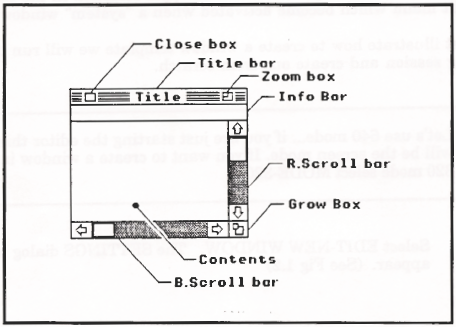
Figure 1.1 Typical Window
|
| Holds the window's title. It may also hold close and zoom boxes, and can act as a drag region for moving the window. |
|
| Used for closing the window. |
|
| Selects the current or alternate sizes for the window. |
|
| Used to scroll the data in the window vertically. |
|
| Used to scroll the data in the window horizontally. |
|
| Used to change the size of the window. |
|
| Provides for an additional display line in the window. |
The Window Manager's main function is to keep track of overlapping windows. You can draw in any window without running over onto the windows in front of it. You can move windows to different locations on the screen, change their planes (front to back order), or change their sizes without concern for how they overlap. The Window Manager keeps track of newly exposed areas and insures that they are properly re-drawn.
EDITOR OPERATION
The Window Editor is a "Desk-top" type P16 application and follows the standard conventions for desk-top applications. Support for New Desk Accessories (NDA's) is provided via the apple selection in the menu bar and an Edit menu which become activated when a "system" window is up.
To best illustrate how to create a window template we will run through an editing session and create one from scratch.
| Let's use 640 mode ... if you are just starting the editor this will be the screen mode. If you want to create a window in 320 mode select MODE-320. |
| We will create a title bar with the title of "Title" and will incorporate right and bottom scroll bars, grow box, close box, and a zoom box. We will also provide the ability to move the window around the screen by dragging the title bar. |
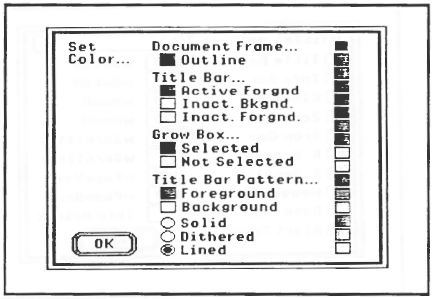
| Let's put some color into the window ... color it to suit your taste. |
| We will set both the normal and zoomed sizes of our window. In the right side of the menu bar you will see the word NORMAL, this indicates that the window you are seeing is the NORMAL window size. When the cursor is an arrow it can be used to operate the window just the way it will in your application, including the ability to select the ZOOMED or NORMAL sizes. |
|
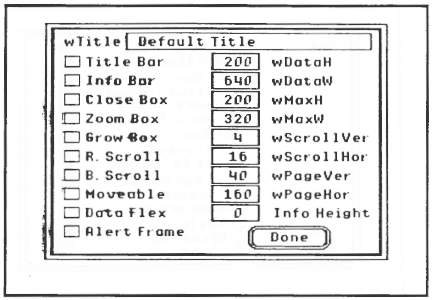
| If the alert frame is selected then no other selections should be made. An Alert Frame has no controls. |
|
| This selection must be accompanied with a height specified in Info Height, The height is usually 13. Info bars are drawn with a special procedure outlined in the Toolbox reference manual. |
|
| Are the height and width (in pixels) for the data area used with this window. A standard Super Hi-Res picture in 320 mode is 200 by 320 pixels. A window that holds this picture would set wDataH to 200 and wData W to 320. |
|
| Set these the same as wDataH and wDataW. |
|
wPageVer wPageHor | Set the way the scroll bars behave when you select the arrows or the thumb. |
|
| Provides the ability to grow and shrink the windows data area dynamically. |
SAVE WINDOWS
When you have created a window template you will want to save it to disk so it can be inserted in your program code.
Select FILE-SAVE AS ... and a save dialog box will appear as below.

Figure 1.4 Save Dialog Box
This box has buttons to select the drive, create a new folder, open or close a folder, cancel this operation and save the file. There is also a box for typing in a filename and three radio buttons across the bottom of the dialog box. These three buttons select the type of output you will be saving.
|
| Select this button to save the template as an OMF2 object file. This filetype can be loaded back in by the editor. |
|
| Select this button to save the template as an APW/ORCA source code file. You cannot reload this file back into the editor |
|
| Select this button to save the template to a resource fork of an extended ProDOS file. This filetype can be loaded back in by the editor. |
Selecting either Object or Source will create or overwrite a file on disk. The operation is straight forward. Selecting Resource, however, will present some extra windows that control how resources are saved to disk. Resources are assigned types and I.D.'s, the type for a CALL-BOX window template is $1002 and is set by the editor. You only need set the I.D. for your resource. You can either rewrite an existing resource by double-clicking on its I.D. number or double-click the ---->New entry to save your resource with the next avaliable I.D. number.
 Figure 1.5 Save Resource ID. Window | You can cancel the resource save operation by clicking on the close box in the title bar of the resource I.D. window. You can also edit the resource I.D. (renumber or delete) by first pressing and holding the OPTION key while double clicking the desired I.D. (See Fig 1.6). When renumbering resource I.D.'s be sure to use eight hex digits in the I.D. number (use leading zeros to pad small numbers). Failure to do so will cause unpredictable results and could ruin the resource fork of the ProDOS file. |

Figure 1.6 Edit Resource ID. Dialog Box
LOAD WINDOWS
Once you have created windows and saved them to disk you may want to load them back into the editor for further editing.
Select FILE-OPEN ... and a load dialog box will appear as shown.
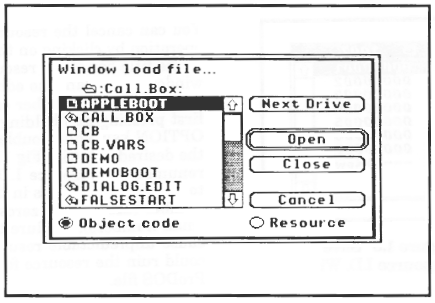
Figure 1.7 Load Dialog Box
This box has buttons to select the drive, open or close a folder, cancel the operation or open a file. There are two radio buttons at the bottom of the dialog box. These buttons select the type of input file you will be loading.
|
| Select this button to load OMF2 window template file. |
|
| Select this button to load the template from a resource fork of an extended ProDOS file. |
Selecting Object will load a file from disk. The operation is straight forward.
Selecting Resource, however, will present some extra windows that control how resources are loaded into memory.
Resources are assigned by types and I.D.'s. The type for a CALL-BOX window template is $1002 and is set by the editor. The only thing you need to set is the I.D. for your resource. You can load a resource by double-clicking on the desired resource I.D. number. (See Fig 1.8)
 Figure 1.8 Load Resource ID. Window | You can cancel the resource save operation by clicking on the close box in the title bar of the resource I.D. window. You can also edit the resource I.D. (renumber or delete) by first pressing and holding the OPTION key while double clicking the desired I.D. (See Fig 1.6). When renumbering resource I.D.'s be sure to have eight hex digits in the I.D. number window (use leading zeroes to pad small numbers). |
Next ->