Version 1.0 Aug 15,1989
CHAPTER 3 - THE MENU EDITOR
OVERVIEW
The CALL BOX Menu Editor creates templates for use by the Apple IIgs Menu Manager. This editor can load either OMF2 object code or resources and can output APW/ORCA sourcecode, OMF2 object code and resources. The resource filetype is $1001 and requires a converter to load into memory. The standard programming procedure for resources is presented at the end of this chapter.
ABOUT MENUS
A menu provides a means of displaying choices or options avaliable to the user without having to remember selections,words or special keys.
Menus appear as a panel usually located at the top of the screen. Each menu has a title and a pull-down menu associated with it. The menu contains a series of selections or "Items" available to the user. (See Fig. 3.26)
An I.D. number is associated with each title and item. The LD. number is used by the menu manager to inform you when a title or item is selected.
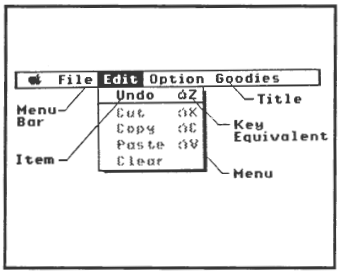
Figure 3.26 Typical Menu Bar and Menu
To use the menu bar the user selects a menu bar title. The title bar is then hi-lited and a pull-down menu appears directly below the title. Keeping the mouse button pressed and moving the cursor up and down the menu, hilites items as you move. When you hilite the menu item you want to select simply release the mouse button and the menu manager will return the I.D. number for the selected item.
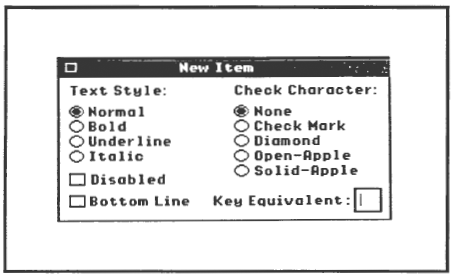
Menus can be customized to a certain extent with this editor, some of the features are:
|
| An alternate way of selecting menu items from the keyboard. |
|
| You can select bold, underline or italisized for the items text. |
|
| You can add check marks, diamonds, open and closed-apples. |
|
| Add visual divisions for groups of like items in menus. |
|
| Lets you select only applicable items. |
EDITOR OPERATION
The Menu Editor is a "Desk-top" type PI6 application and follows the standard conventions for desk-top applications. Support for New Desk Accessories (NDA's) is provided via the apple selection in the menu bar and an Edit menu which activates when a "system" window is up.
To best illustrate how to create a Menu template let's run through an editing session and create one from scratch.
| Let's make this menu in 640 mode. The menu editor functions in 640 mode. You can test in either mode, but the actual editing process is in 640. |
|
| Select this button to save the template as an OMF2 object file. This filetype can be loaded back in by the editor. |
|
| Select this button to save the template as an APW/ORCA source code file. This filetype can not be loaded back into the editor. |
|
| Select this button to save the template to a resource fork of an extended ProDOS file. This filetype can be loaded back in by the editor. |
Selecting either Object or Source will create or overwrite a file on a disk and the operation is pretty straight foreward. Selecting Resource however will present some extra windows that control how resources are saved to disk. Resources come in types and I.D.'s, the type for a CALL BOX menu template is $1000 and is hard-set by the editor ... the only thing you need to set is the I.D. for your resource. You can either rewrite an existing resource by double-clicking on its I.D. number if one exists or doubleclicking the ---->New entry to save your resource as the next avaliable I.D. number. (See Fig 3.30).
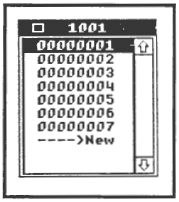
Figure 3.30 Save Resource I.D. Window
You can cancel the resource save operation by clicking the close box in the title bar of the resource LD. window. You can also edit the resource I.D. (re-number or delete) by first pressing and holding the OPTION key while double-clicking the desired I.D. (See Fig 3.31).
When re-numbering resource I.D.'s be sure to have 8 hex digits in the LD. number window (use leading zeroes to pad small numbers). Failure to do so will cause unpredictable results and could ruin the resource fork of the ProDOS file.
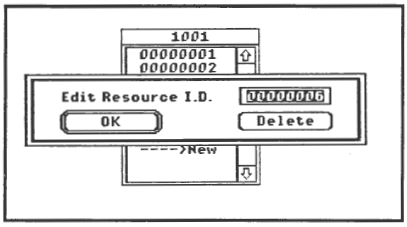
Figure 3.31 Edit Resource ID. Dialog Box
If a resource fork does not exist for a given ProDOS file a dialog box will appear that gives you the option of creating one.
Once you have created menus and saved them to disk you may want to load them back into this editor for further editing.
LOAD MENUS
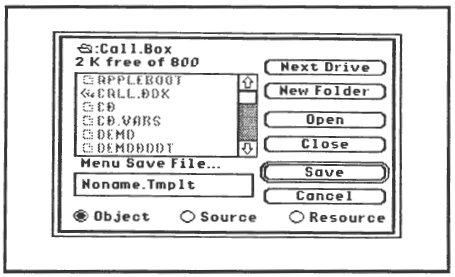
Select FILE-OPEN ... and a load dialog box will appear.
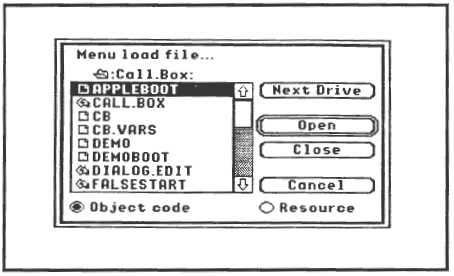
Figure 3.32 Load Dialog Box
This box has buttons to select the drive, open or close a folder, cancel this operation and open the file. There are radio buttons to select the type of input you will be loading.
|
| Select this button to load an OMF2 type of menu template file. |
|
| Select this button to load the template from a resource fork of an extended ProDOS file. |
Selecting Object will load a file from disk and the operation is pretty straight foreward. Selecting Resource however will present some extra windows that control how resources are loaded into memory.
Resources come in types and I.D.'s, the type for a CALL BOX menu template is $1001 and is hard-set by the editor ... the only thing you need to set is the I.D. for your resource. You can load a resource by double-clicking on the desired resource I.D. number. (See Fig 3.33)
You can cancel the resource load operation by clicking the close box in the title bar of the resource I.D. window. You can also edit the resource LD. (re-number or delete) by first pressing and holding the OPTION key while double-clicking the desired I.D. (See Fig 3.31) When re-numbering resource I.D.'s be sure to use 8 hex digits in the I.D. number window (use leading zeroes to pad small numbers). Failure to do so will cause unpredictable results and could ruin the resource fork of the ProDOS file.
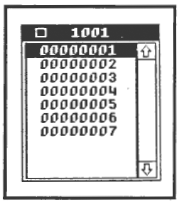
Figure 3.33 Load Resource ID. Window
If a resource fork does not exist for a given ProDOS file then no template will be loaded.
<- Previous | Next ->